A Step-by-Step Guide for Corrective and Preventive Action Using SafetyChain


Lily Brown

Put an end to Corrective and Preventive Action (CAPA) plans that get lost in the back of a filing cabinet or on someone’s desk. By choosing a solution to modernize the process, you can easily track, schedule, and follow through on all investigations. This step-by-step guide will help you understand the SafetyChain tools available to efficiently perform CAPA when necessary to ensure that your facility can quickly meet requirements and resolve issues.
Both CAPA and root cause analyses play important roles in identifying and mitigating problems in manufacturing, and there are often ample opportunities for improvement with these two processes. First, it’s essential to understand the difference between root cause analysis and CAPA. The root cause clearly identifies the source or sources of the issue, while CAPA is an action plan to address the root cause identified and prevent it from happening again. The importance of CAPA cannot be overstated.
Corrective and Preventive Action Examples
CAPAs can come from foreign material incidents, customer complaints, EHS, Audit non-conformances, and continuous improvement processes. For example, a foreign material incident documented through a customer complaint requires a robust process that SafetyChain is optimized to handle.
With the steps below you can simplify CAPA administration, decrease resolution time, and measure CAPA effectiveness to keep your facility running smoothly.
How to Set Up Corrective and Preventive Actions in SafetyChain
SafetyChain's Quality Manager streamlines the CAPA process to promote continuous improvement, and using the platform for CAPA management is simple. We will discuss how to set up SafetyChain for CAPA. This way, when a situation occurs that requires CAPA, you and your team are prepared to start the process quickly. Setting up CAPA in SafetyChain is a simple 4-step process:
Create a form (such as an FSQA form) for when the problem is first identified
Customize Case Settings.
Build a workflow.
Test the workflow
Here’s a closer look at each step:
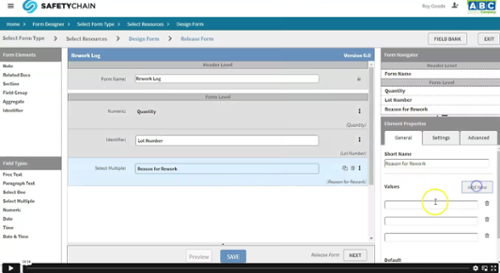
1.) Set Up a Form
When creating a form that may require CAPA, the objective is to add the corrective actions to the form being created. There are settings to allow users to input the corrective action they took in real-time and whether the issue is resolved. Records with corrective action and marked unresolved will have an easy filter to create a case. The form can also include a question for “Case Review” which would allow an operator to flag a record they believe may require additional actions.
For example, a form can be created to document a quality check, and if any of the questions are non-compliant corrective actions will be required, and a user can easily review to determine if a Case needs to be created for more follow-up.
Watch this short video to learn how you can easily create a form.
2) Case Settings
Every Case has a Category and Stage. The Category list is customizable to match your use cases. The stage list is customizable and different categories can have different stages available for the desired workflow. The stages are also related to a CAPA incident workflow or a non-CAPA incident workflow. This provides the customization required to address a CAPA incident differently—understanding can help you meet requirements and resolve issues quickly.
To set up a case, Select "Cases" from the LINK menu to access the Case Management section of LINK. Use the "New Case" button in the top right of your screen to create a New Case, and the "Add New Case" window will appear. Here, you can enter a Name, Source, Category, Plant Location, Date, and Sub-Category. Select "Add" when these have been configured.
What is Case Management?
To understand how to set up Case locations, it is essential to understand Case Management. Case Management is the framework used to manage and track an issue or event from occurrence through resolution. It provides the structure to relate records completed through FSQA and assign tasks with customized stages to support various workflows. Cases can also be created without a related record as a standalone deliverable to formalize a process and allow for collaboration to resolve it.
3.) Build a CAPA Workflow
Once the Case is created, build your workflow by creating, scheduling, and assigning all required tasks for the corrective and preventive actions needed. Schedule your tasks at the day, week, month, or yearly interval to plan out which forms need to be completed when. Tasks can be easily tracked in the Case to see what might have been overlooked or not completed.
Start a new task by clicking on the “New Task” button in the Case. This will open a new window where you will be prompted for the initial information required to schedule a task: the subject, the stage, the Cases Form, Assigned User, Due date and time, Task Note, and an email that will be sent to the assigned user (optional). Next, select the appropriate stage for the workflow and assign the Case Form to the appropriate user. The Task Subject will display in the Case Report, and the Task Note is visible in the Cases Form for the user to reference.
After ensuring that you have set up the correct tasks (see example) and forms have been set up and assigned to the right individuals, your workflow is ready to be completed. You can come back to this workflow at any time to make edits, adjust times and tasks, reorder the tasks or completed records, and check to see what has been completed. As tasks are completed, you can move the case to the next stage to indicate that stage has been completed.
4.) Test CAPA
Before you receive your first failed form and need to perform CAPA, it’s a good idea to test everything out. You can do this by inputting a failure in one of your forms to trigger an alert to the operator who will manage the CAPA case. For example, the operator may receive an alert of foreign material contamination (see example form above). This test run is a good way to ensure that all operators who will be involved in the CAPA process understand how to perform CAPA in SafetyChain.
How to Perform CAPA in SafetyChain
When you receive a failed form notification, go to the form and check the real-time corrective action notes from the operator.
Go to the next step and/or find any related records. It’s important to check because the operator may have already taken the necessary corrective action, and other steps may not be needed. From this form notification, you can see what is happening in real-time.
If other corrective and preventive actions are needed, the user can create a case related to this record and mark the case as CAPA yes. The tasks required can be assigned to the appropriate user with a deadline. This allows for easy organization of the CAPA process and allows anyone to monitor the process and ensure that the correct steps were taken.
Once a user is assigned one or all of these corrective and preventive actions, they can mark their completion in SafetyChain. This allows for a digital record of the entire CAPA process from incident alert to completion of CAPA.
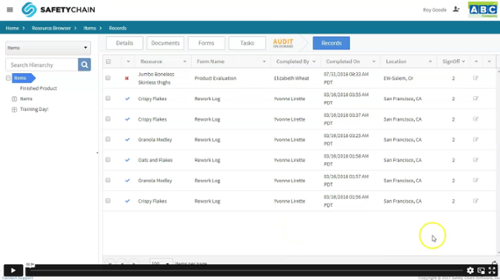
Know What is Happening at Every Step: Review and Sign-Off Records
Performing CAPA in SafetyChain takes the guesswork out of knowing that your team follows up with corrective and preventive actions. You can now easily check back in on the progress of CAPA at any point to see who has accomplished their tasks, what tasks still need to be done, who is assigned to do them, what the assigned date is. This can all be done in the Cases Grid and through the Cases Dashboard. As tasks are completed, the case owner will change the stage of the case to indicate that a completed task has been validated. Once the tasks are all completed, the Case is marked as Complete by the owner. Once all the corrective actions have been validated, the Case is Closed.
Closed Cases are still accessible and will include the days to complete the case and days to close it.
Watch this short video to see the process.
Conclusion
Clearly, CAPA does not have to be a hassle or oversight. This step-by-step guide showed the power of the SafetyChain CAPA software to ensure that your facility can quickly meet requirements and resolve issues. By prioritizing the implementation of CAPA software to assist with the investigation, process manufacturers have streamlined their analysis and ensured results. Don’t settle for so so. Make CAPA a valuable and functioning part of your organization. Learn what the value is for your organization by scheduling a demo today!


